Camera words, jargon and terms dictionary
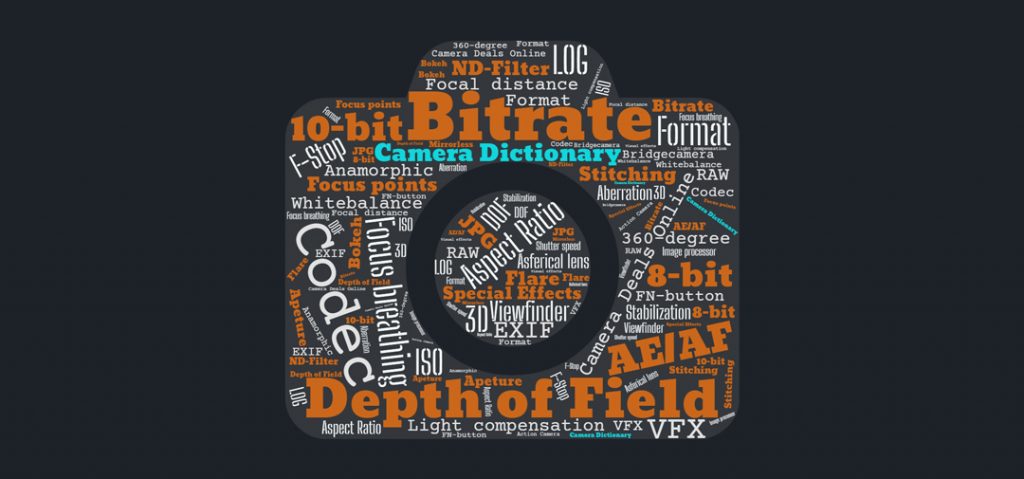 Looking for a new camera or video camera, but not a specialist in camera terms and words? Nothing to worry about, even as a professional you sometimes come across words that you have to look up in the camera term dictionary. To help you, we have made Camera Deals Online a dictionary that we are constantly updating. After reading this camera words and terms dictionary, we are certain that it will be easier to find your new camera product. All camera terms and words in this dictionary are listed in alphabetical order.
– All information on this website and page is subject to copyright and is the property of CameraDealsOnline.com. This information may not be reproduced or copied without the permission of CameraDealsOnline.com. –
8 bit vs 10 bit video
In addition to the way the colors are subsampled (4:2:0 / 4:2:2), the color depth is also important. Most video material uses an 8-bit color depth, which is the same as for JPEG images. This is usually more than enough, but when working with flat color profiles (log) or if you want extreme color processing, extra information in the color depth is useful. This is where 10-bit comes into play. Naturally, this will make the files larger. Some cameras can record 10-bit internally, with others you have to connect them to a recorder via a (mini) HDMI connection. In a modern camera, you might want to look into models who have 10-bit recordings built-in.
360-degree video / Stitching
Making 360-degree images yourself is possible by using just one camera, taking widescreen photos from 6 angles, and putting them together afterwards. You may recognize this principle from the panorama or 360-degree function on your smartphone. This technique only works for taking pictures. With 360-degree photos you have a flat image that you can navigate through. It might be seamlessly looped at the edges, so you can keep scrolling. If you want to apply this technique for video, you need several cameras. For example, the ‘old’ technique used 6 (action) cameras in a case, with each camera aiming in a different direction. Using special desktop software, the images are put together or ‘stitched’. You will often come across the word stitch or stitching. Putting the images together manually is a long, difficult and expensive process. There is now software that can do this itself, with the sewing edges barely visible. Modern 360-degree cameras are affordable and great for sports, vlogging and wide-angle photography and film, like interior photography.
AE/AF
You typically see it in a text or in the settings of your camera: AE/AF. AE stands for ‘Auto Exposure’ and AF stands for ‘Autofocus’.
Auto Exposure (lock)
If your camera is set to ‘A’ (automatic) mode, the camera will automatically set the exposure for you. This is done by adjusting the exposure triangle (shutter speed, aperture, ISO). Then there is the AE-L (Auto Exposure-Lock). Many cameras have a button that says “AE-L”. This ‘lock’ ensures that the aperture and shutter speed are fixed. This can come in handy in situations where you need a specific exposure. You use this mode when you shoot in an ‘auto mode’. This can be fully automatic, but also mode A (Aperture/Aperture), S (Shutter/shutter speed) or P (Shutter & Aperture). The auto mode sets all settings based on the ambient light. With the AE-Lock, you ensure that the aperture and shutter speed are not adjusted.
Auto Focus (lock)
With autofocus, the camera automatically focuses on an object. The AF-L (lock) fixes the focus you have at that moment. This is especially useful when capturing a static object. If you or the object moves, the object will no longer be in focus because of the AF-Lock.
Anamorphic
Anamorphic comes from the original 35mm film used in cinematography. When using anamorphic, the whole sensor is used, and therefore you see more on the final image. With normal lenses, you get a wide image where pieces have been removed from the top and bottom (cropped). If you use an anamorphic lens or mode on the camera, you will have a wider image than the size of the sensor. This is useful for many filmmakers because they can then crop different images afterwards. Anamorphic lenses also help you create effects like elliptical bokehs and elongated lens flares.
Aspect ratio
The aspect ratio is about the ratio of the height to the width of the image. This is especially important for video because this ratio determines how the video looks on screen. The most commonly used video aspect ratio is 16:9 (16 units high, 9 units wide). Today, this is the standard in video on television and in film. With older (square) televisions, the aspect ratio was 4:3. The images were then recorded and broadcast in this format.
With Cinema 4K (C4K or DCI 4K: 4096 x 2160p), the aspect ratio is slightly wider than with 4K UHD (3840 x 2160). With good cameras, you can determine the aspect ratio before you record, but it can also be adjusted during editing. Think of 3:2, 17:9, 21:9 (super widescreen) or 1:1.
AF system & focus points
The AF system stands for Auto Focus System. This term is used to indicate what kind of autofocus the camera has and at what speed. You sometimes also see the number of focus points, for example 49. This means that there are 49 points that the sensor can use to automatically focus on. The higher the number, the more depth the sensor can see and the better, faster and more precise the lens can autofocus. The speed of the autofocus system also has to do with the quality of the image processor and technique it uses.
AFS/AFF/AFC
Many mirrorless and SLR cameras have a button labeled ‘AFS/AFF’ and ‘AFC’. They are very useful functions, but you may not know what it means and how to use it. All three have to do with automatic focusing.

Photo: Yoreh Schipper
Auto Focus Single (AFS)
This feature is useful when capturing static objects. With the AFS it is possible to determine the size of the focus area and distance from the object. Once you’ve determined this, half-press the shutter button to focus.
Auto Focus Flexible (AFF)
This Auto Focus Flexible comes in handy when your object can move a little bit. Within the specified focus area, the camera tries to focus on the object. The camera does this by calculating the color contrasts. The AFF is also used, for example, in Macro Photography. Suppose you want to photograph a flower, then it can move a bit due to the wind. Thanks to the AFF, the camera knows what to focus on. A large number of focus points is useful here.
Auto Focus Continuous (AFC)
The AFC is usually found under a separate button. In this mode, the camera is constantly looking for the correct focus. For photography, it is convenient to use the AFS/AFF mode. If you set the camera to AFC mode, you have the chance that the camera will constantly refocus. That’s why the AFC mode is especially useful when shooting video.
Aspherical lens element
The word Aspheric comes from the Greek and means non-spherical. Thus, a Spherical element (glass piece) is a spherical lens surface and an Aspherical is a non-spherical lens surface. An Aspherical lens can take on different shapes. These types of lenses are used in a camera lens because they can remove or correct certain image errors. Because Spherical and Aspherical elements work together, you get a better picture. Making Aspherical lenses is an expensive process. A lens with these elements will therefore be expensive. But it’s definitely worth it!

Aspheric Lens Element
Back Side Illuminated Sensor (BSI)
A Back Side Illuminated (BSI) sensor is an image sensor for digital cameras that makes it possible to absorb more light than Front Side Illuminated sensors.
Each sensor is made up of individual picture elements, pixels, which are arranged in matrix form. The light passes through the camera lens to hit the pixels first and the sensor after. With traditional sensors, those two still have some wiring in between. The light must therefore first pass the wiring to reach the sensor, and thus loses light. By processing the wiring behind the sensor, the sensor can collect more light, and you will therefore suffer from less noise.
This technology used to be expensive to make and was mainly found in surveillance cameras, microscopes, and cameras for astronomers. In 2009, Sony released the CMOS Exmor R sensor. Several brands are now making BSI sensors, and they are also becoming cheaper. So if a camera has a BSI sensor, you know that you can expect even better image quality.
Image stabilization
Image stabilization is used in both still and video cameras to absorb and minimize unintentional shakes and movements. Moving the camera while taking the picture may cause camera shake as well. You then see a photo that seems moved, in which the subject is slightly stretched by long, vague stripes. This stabilization is performed by the lens or the body.

Blurred photo. By Cameradealsonline / Yoreh Schipper
Image stabilization can be done in different ways:
- Optical stabilization through the lens
- Elements in the lens move to reduce movements and shakes.
- Stabilization in the camera body
- The sensor itself moves in 3-axis to reduce shakes
- Electronic stabilization
- This type of stabilization will cost you image quality, since the camera zooms in onto the moving image in order to reduce shakes
- Stabilization in post-processing (for film)
- Stabilization done with software on the computer
Image processor
Every digital still camera or video camera comes with an image processor. This image processor is a chip that converts the information received on the sensor into an actual JPEG, RAW photo or video file. The processor ensures that colors, contrasts, lighting and color tones come out correctly and realistically. Read the extensive article about image processors to learn more about how an image processor works, what exactly it does and what types there are.

Image processors. Photo: Cameradealsonline / Nikon / Sony / Canon
Exposure Compensation (EV) [+/-]
In photography, exposure compensation is used to adjust the combination of ISO, shutter speed, and aperture equivalently up or down all at once.
Exposure compensation can only be used when the camera is in automatic mode. The light meter in your camera determines the values for taking the photo. But of course, the camera can be wrong. Take a mountain with white snow on it for instance. The snow is bright and so the automatic camera mode can set the exposure too low. This will give you a dark photo. By adjusting the exposure compensation (EV – Exposure Value) upwards, you get a better exposed photo.
Snowy mountains with -2 EV exposure compensation. Photo: Utudanuki

Snowy mountains with -2 EV exposure compensation. Photo: Utudanuki

Snowy mountains without exposure compensation Photo: Utudanuki
In-camera exposure system
When the camera calculates the light, it assumes an average value with an average grayscale of 18%. The camera therefore looks for this gray value in order to calculate the light on that basis and to adjust the exposure triangle.
Set the exposure on the camera with [+/-]
You will find a button on almost every camera to adjust the exposure. You can recognize this by the [+/-] symbol. This button ensures that you can adjust the light in equal gradations. In total, you can over- and under-expose up to +3 and -3 stops. You can set the light per 1 stop or 1/3rd stop. If you put the light towards the plus (+), the image will become lighter. If you go towards the minus (-), the image will become darker.

Gif via PhotographyCor
How to know if the light is right
The measurement of the light is done digitally and based on the 18% gray value. As mentioned earlier, the camera can get confused and show a snowy mountain very underexposed. It is therefore always important that you trust yourself. But, if you really want to be sure of a good exposure, it is best to check the histogram. The histogram provides information about the exposure of your photo. In this camera words dictionary, we also explain what a histogram is.
Exposure triangle
Exposure triangle is a word you probably don’t see too often, but it’s an essential one. Before you take a photo or start recording video, you have to make sure the lighting is right. Not too much light, not too little. By playing with the ISO value, shutter speed and aperture you get the right exposure. The ISO, aperture and shutter speed together make up the exposure triangle. In this camera dictionary you find more information about ISO-value, Shutter Speed and Aperture.
Bit rate
The Bitrate indicates the speed at which video data is transferred and is related to the video resolution and quality settings. The higher the bit rate, the more information is transferred, which results in better image quality. A cheaper camera will have a bit rate of 50 to100Mbps (megabits per second), but the high-end and expensive cameras will go from 200 to even 1800Mbps. Bitrate does not say everything about the quality, but it does indicate what kind of camera you are dealing with. In general, a 2K image with 400Mbps gives better image quality than an 6K image with 100Mbps.
Focal length
The distance from the sensor to the center of the lens is called focal length. The lower the number, the wider the image you get. If the lens is set to 12mm, you have a very wide image, and it is easier to capture buildings, landscapes or architecture. If the lens is at 300mm, then you are zoomed in far, and you bring objects that are far away closer.
Prime lenses
Prime lenses have a fixed focal length, for example 35mm. You cannot zoom with these lenses. The advantage of prime lenses is that they often provide a sharper and purer image because all the glass in the lens is made for that one focal point. The disadvantage is that you have to change lenses if you want to take a wider, more zoomed shot.
Zoom lenses
Zoom lenses have a variable focal length, for example from 24 to 70mm. These types of lenses make the photographer flexible, and you don’t have to change lenses frequently. This can be helpful for sports or fast-moving objects, for example. The quality of the zoom lens depends on the quality of used glass and housing, but also the maximum aperture. A 24-70mm f/2.8 zoom lens has a fixed maximum aperture of f/2.8. Making zoom lenses with bigger maximum aperture like f/2.8 is expensive; therefore the lenses are too. Other lenses have a variable aperture whilst zooming in and out. These are cheaper and typically of lesser quality.

Prime and zoom lenses
Bridge camera
A bridge camera is actually a compact camera with the ability to zoom in extremely far, up to 60 or 70 times! These cameras have a built-in lens, but look a bit like an DSLR camera. Another feature of bridge cameras is that you can set many settings manually. This is almost always done automatically with compact cameras. Settings that you can adjust yourself are, for example, focus, shutter speed, aperture, and ISO. This is also possible on some compact cameras, but a bridge camera has separate buttons for this, making it easier and faster.
Bridge cameras can be quite expensive, but the advantage is that you have a good all-in-one camera. You keep it easy to operate like you have with a compact camera, and you can zoom in extremely far. In addition, you do not need extra lenses and therefore have less weight with you. Bridge cameras are also called Superzoom cameras because of their large zoom range, but because of that big zoom, the camera itself can big quite big.
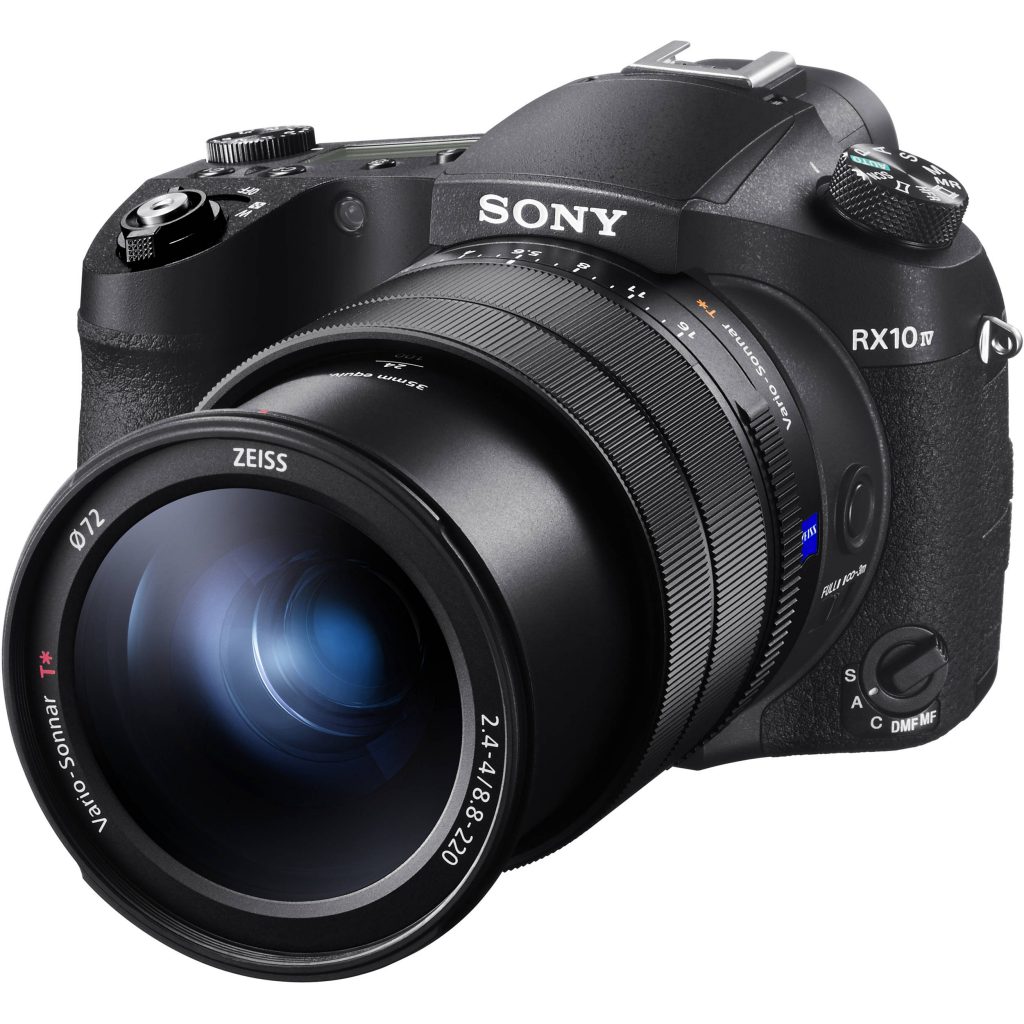
Sony Cybershot DSC RX10 MARK IV | Bridge or Superzoom camera
Bokeh
The word Bokeh comes from Japanese and describes the general quality of the photo that is out of focus. This applies to both the foreground and background. In general, a fuzzy or soft out-of-focus area is considered good, while an out-of-focus area with noise or sharp edges is considered bad. Most people consider bokeh to be the spheres and circles that form when light sources are out of focus. Other people use the word Bokeh for the blurriness of focus, but these are all elements of bokeh. Do you want a strong bokeh effect, where the bulbs almost overlap, then you have to make sure that you have little depth of field. That means that a small part of the picture is sharp and the rest of the picture is blurry. You get this by setting the largest possible aperture of, for example, f/1.2. Do you want a light bokeh effect? Then you have to set the f-stop higher. For example at f/8.

Bokeh lights. Photo: Yoreh Schipper / CameraDealsOnline
Chromatic Aberration
Chromatic aberration is a color distortion and error that occurs in the lens. This effect occurs when light of different wavelengths (colors) are not deflected in the same way by the lens. The idea is that all the light remains bundled and ends up at the same point on the sensor, but with aberration that doesn’t happen, and the lights ends up not in the center. You often see chromatic aberration at the edges of subjects with hard contrasts. Think of branches of a tree or a house with a bright sky behind it. The effect you see is a purple or blue glow around the edges of objects.
Zoom lenses and lower quality lenses in particular can suffer from this effect. When you photograph with strong contrasts, it is advisable to do this in RAW so that you can eliminate the effect in post-processing. A smaller focal length and smaller aperture (higher number) also help to reduce this effect. Of course, high-quality glass will almost eliminate this unwanted effect.

Chromatic Aberration around edges of branches in the tree. Photo: Yoreh Schipper / CameraDealsOnline
Clicks
A ‘click’ (or shutter count or actuation) stands for one taken photo. A click occurs each time the shutter opens and closes. When you buy a new camera, you often see how many clicks or photos the camera can handle before the battery is empty. You can also see how long the camera has lasted by the number of clicks. You can compare it to the mileage of a car. When you buy a second-hand camera, it is therefore important to look at the number of clicks.
How do you check the correct number of clicks?
With a new camera, you can see the number of clicks from the file name, for example IMG_1920.jpg. That would mean you took 1920 photos/clicks. However, this is not entirely reliable because the moment the camera is put in ‘live view’, the shutter opens and closes one more time. The counter goes back to 0 after photo 9999 and therefore the filename is not reliable to know how many clicks the camera has done.
Sometimes it is possible to request the total number of clicks in the camera’s menu. But the number of clicks is also stored in the metadata of each photo. On an Apple computer, you can see the number of clicks of the camera in ‘preview’: open the original JPG or RAW file and then open the info window. Click on the tab with the ‘i’ and then the EXIF tab. Scroll down until you see “image number”. The number you see there is the number of clicks. On a Windows it takes a little more effort to find out the number of clicks. You then need an extra program such as Irfanview.
Codec vs Format
These two terms can be a bit confusing and are often used interchangeably, but they are not the same thing. You can see the ‘format’ as a container that contains the video and other information such as sound and metadata. The “codec” is purely a particular video compression used by a system. The codec is then processed into the format.
As an example, the Sony A7s III uses the XAVC HS format and uses the H.265 video codec. This XAVC HS format is proprietary to Sony, but the H.265 video compression codec can be used by any maker. The widely used MPEG-4 format (MP4) uses the H.264 codec. A format is therefore always necessary to be able to play certain codecs and other metadata.
Color/Chroma Subsampling (4:2:0 / 4:2:2)
Video contains a lot of data and is recorded using various compression techniques. One is chroma (or color) subsampling, which compresses the two chroma channels of the video signal compared to the luma channel (the first of three numbers). The technical explanation is complex, but there are currently two types in common use. 4:2:0 sampling gives good quality and good compression, and is the default setting for most cameras that capture video to an internal memory card. 4:2:2 sampling gives better quality but needs an external recorder or one of the latest more advanced video cameras – some of these can record 4:2:2 video internally.
Compact camera
A compact camera is a digital camera with a fixed built-in lens. These small and light cameras are made to sell at lower prices. A point-and-shoot device like this is made for consumers who want to take a good photo, but don’t want or can’t put much effort into it. These cameras are helpful, for example, for everyday photography or holidays.
Although compact cameras may have the stamp of ‘amateur camera’, with the more advanced models you can change quite some settings yourself. So don’t be fooled by the amateurish image these little powerhouses have. Do you want to be able to change lenses or change settings such as aperture and shutter speed, then take a look at mirrorless cameras or DSLR cameras.
The built-in lens of some compact cameras can zoom up to 50x. If this is the case, they are also referred to as bridge cameras or super zoom cameras. Nowadays, almost every compact camera has at least 12 to 15 megapixels, Full-HD (or 4K) movie function, creative filters, built-in flash and a tilting touchscreen.
Do you want your compact camera to be able to film 4K, to have a tiltable screen, Bluetooth, NFC and WiFi? Then you enter the class of high-end compact cameras.

Canon PowerShot SX740 HS Black compact camera
Contrast Detection vs Phase Detection
Phase-detection autofocus is ‘smarter’ than contrast-detection because it not only sees when an object is out of focus, but also where in the frame the main object is located and where and how much focus should be present. The contrast detection can cause ‘hunting’, the search for the right focus. Panasonic uses Depth from Defocus, which uses the information from the blur in the lens to know where an object is, much like contrast detection. This system is very fast, but often causes problems when it is in continuous-focus mode, especially in film this problem is something you don’t wish for. In general, phase detection is chosen over contrast detection.
Aperture or f-stop
The aperture or f-stop determines how much light is allowed into the lens. The aperture is set in the lens by diaphragm blades that act as a kind of curtain. A large aperture means that the lens is fully open and the maximum light enters. A small aperture means that almost no light is let in. A large aperture is indicated by a low number such as f/1.8, a small aperture by a high number such as f/12. Lenses with a large aperture (like f/1.2) are more expensive.
Diaphragm Blades
The diaphragm blades regulate the light that enters into the lens. If they are fully retracted, then as much light as possible enters. When you look directly into the lens with the bare eye and you only see a small hole, then little light is allowed into the lens. This is because the blades are almost closed. The number of aperture blades plays a role in how the photo will look. The more blades there are in the lens, the more accurate you can work. Your background blurs and bokehs will look a lot smoother as well, when you have more than 7 diaphragm blades.
You can also see the effect of the number of aperture blades in lens flares, for example. The more blades the lens has, the rounder the lens flares become. The image below clearly shows that the round lens flares contain 7 aperture blades in the lens used.
Round lens flare with 7 aperture blades on Havana Skyline photo. Photo: Yoreh Schipper
EXIF
EXIF data is the additional information that is stored in a JPEG or a RAW photo file. The abbreviation EXIF stands for EXchangeable Image File Photo. Another name that you will also encounter for this data is ‘Metadata’ or ‘Metadata’.
Data that is stored in EXIF, among other things:
- Recording date
- Recording time
- File format (JPEG/RAW)
- File name
- File size
- Original image size
- Image size (after cropping/cropping)
- Location (if GPS present or Wifi)
- Shutter speed
- Focal length of the lens
- Focal length equivalent 35mm
- Diaphragm
- ISO Value
- Exposure (via histogram)
- Lens type and information
- Flash (fired or not)
- DPI (Dots Per Image)
- PPI (Pixel Per Image)
- Color profile (e.g. sRGB)
- Compression
- Contact details (if filled in)
- Copyright (if entered)
- Camera type/Model number
- Camera Brand
- Serial Number
- Software number
What do you use EXIF data for?
The EXIF data comes in handy when you want to see which settings you have used when you took the photo. For example, think of the settings for that one good studio photoshoot or if a photo has completely failed, you can use metadata to find out what went wrong or right. Sometimes, you may have taken two photos of a subject, one of which is slightly better than the other. The metadata allows you to determine why one photo is better than the other.
Where can I find the EXIF data?
Do you work on a Windows computer? Right-click on the image > Properties > Tab: Details. If you work on an Apple, right-click on the photo > Show Info. EXIF data can also be found in Adobe Lightroom (or other photo editing programs) by looking in the Metadata tab or pressing the letter ‘i’. Most photo editing programs have a special screen where you can see all data.
Focus Breathing
Focus Breathing means that there is a slight change in focal length the moment you turn the zoom ring of a lens. This usually occurs when going from minimum to infinity focus distance. While shooting film, a minimal focal change can occasionally be seen. This occurs with both zoom and prime lenses.
In general, Focus Breathing doesn’t matter much, and it’s especially at a larger zoom that you’ll notice it. Of course this can be annoying when you make videos because you would rather not see this effect in your image, of course. This change in focal length only occurs during focusing. After that, everything is fine again. The better the quality of the lens, the glass, and the mechanism inside, the less focus breathing will occur.
Frame or picture per second (FPS)
In photography, fps stands for photo per second. In cinematography, this means frame per second. These two add up to the same thing, as one frame equals one picture or photo.
FPS in photography
If the number of photos per second is indicated for photo cameras, then this means the burst mode. Burst mode takes as many photos as the device can handle in a short period of time. However, the device can only do this for a short period of time. The number of photos per second with the same camera is different with continuous mode. You can hold the button continuously and take photos quickly, until the buffer is full.
For example, a model’s fps might be 10 in burst mode and 5 in continuous mode. The reason for this difference has to do with the buffer. The buffer is a temporary storage, after which the photos are processed. The number of photos you can take in quick succession depends on how large and fast the buffer is.
FPS in cinematography
Frames per second represents the number of images the camera captures per second. The minimum number of frames you need to create a smooth running video image is 23,976 frames per second. The higher the ‘frame rate’, the faster movements the camera can capture sharply. A slow-motion video image is possible from 50 frames per second. This image can then be slowed down twice to 25 frames per second. There are special super slow-motion cameras that can capture 10,000 (or more) frames per second. In this way, for example, you can see a balloon filled with water explode in super, super, super slow-motion.
Gamma in photography and cinematography
Gamma is the range of color values that a monitor or camera screen can display. Because monitors can display fewer blacks than the human eye can see, you occasionally need gamma correction. This is done from the camera or on your computer screen. In this way, certain black tones can be displayed that you otherwise would not have been able to see. More advanced and newer screens can display more and more different shades and colors, reducing the need for gamma correction.
Gimbal Stabilization
When talking about a (camera) gimbal, we talk about an electronic device that keeps the camera stable. Literally, the “gimbal” part ensures that rotation and stabilization in multiple axes are possible. Camera gimbals usually stabilize the camera on at least 2, but usually 3 axes. It is possible to find gimbals that combine a ‘steadycam’. A steadycam or steadicam is used for large and heavy cameras. This variant includes a vest/harness with a large arm with springs hanging from it. On that arm, you will find the gimbal. Smartphone gimbals are available for consumers to absorb shocks, taps and walking movements. There are separate gimbals categories for action cameras, mirrorless cameras, DSLRs and the large professional cameras. Nowadays, you have electronically powered gimbals that do the stabilization work for you, but years ago this was done with counterweights. Today, there are still many (professional) filmmakers who prefer a stabilization system with counterweights.
High Dynamic Range (HDR)
High Dynamic Range (HDR) images take 3 to 9 photos in a short time with different exposures. The number of photos depends on your camera or your settings. Where the first photo focuses on the highlights and takes an underexposed photo, the last photo will focus on the shadows and take an overexposed photo. These photos are merged into 1 photo to have the highest possible dynamic range. To the eye, this means that the photo shows more details in the highlights (e.g. the sky) and more details in the shadows. The photo gets closer to what we can see with the bare eye.
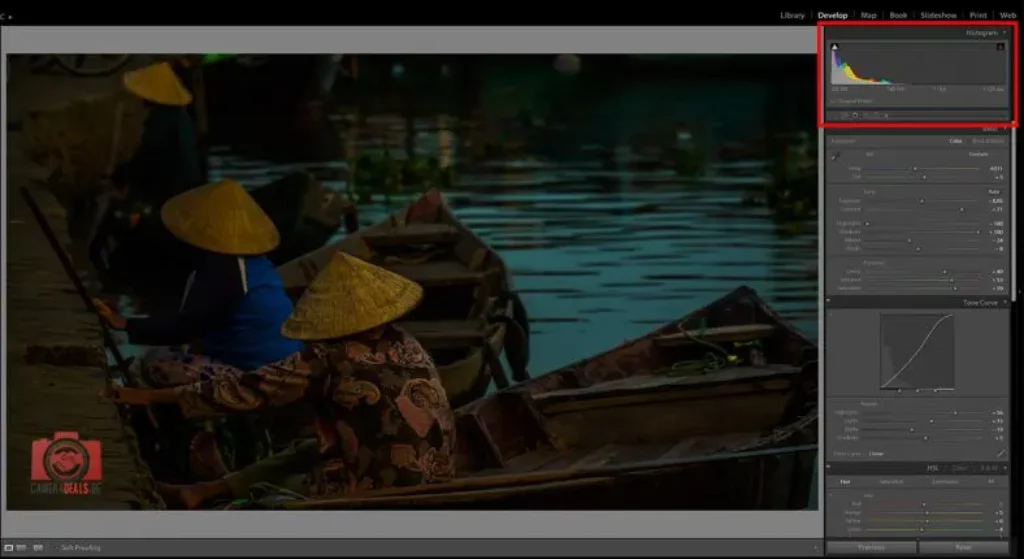
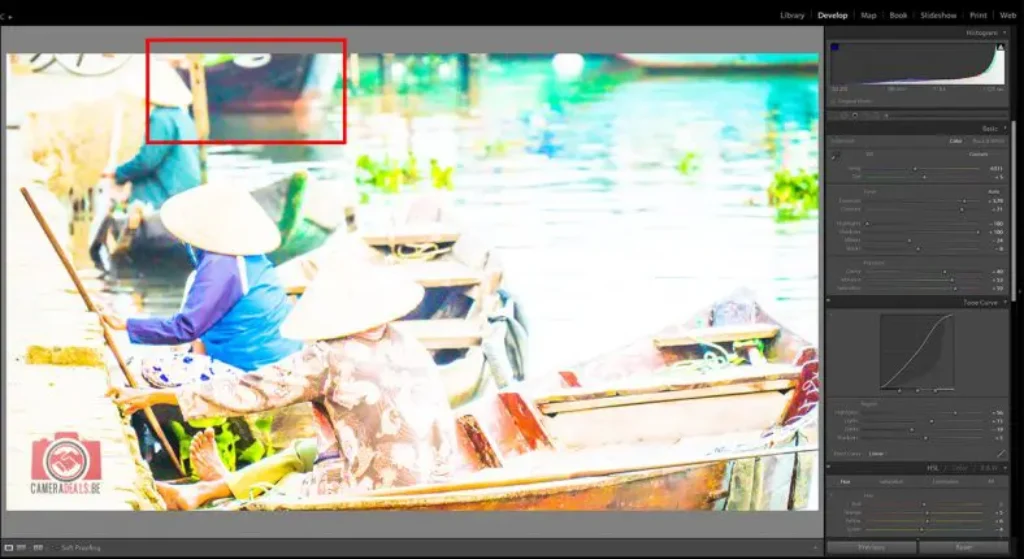
Histogram
A histogram represents the dynamic range of pixel shadows and highlights in a bar graph. Within the graph, you can see the brightness of the colors. The colors you see in this graph have been converted to black. The higher the peak, the brighter the color. You use a histogram to measure how much light is coming in and to make sure you don’t get an overexposed photo or video.
If there is a lot of activity on the left side of the photo, that indicates underexposure. If the activity is high on the right side, it indicates overexposure.
It is possible to enable the histogram on your camera. This prevents you from taking an over- or under-exposed photo. If this does happen, you can try to adjust the photo in photo editing programs such as Photoshop or Lightroom. It is best if you take the photo in a large JPEG or RAW format. You then have more editing space.
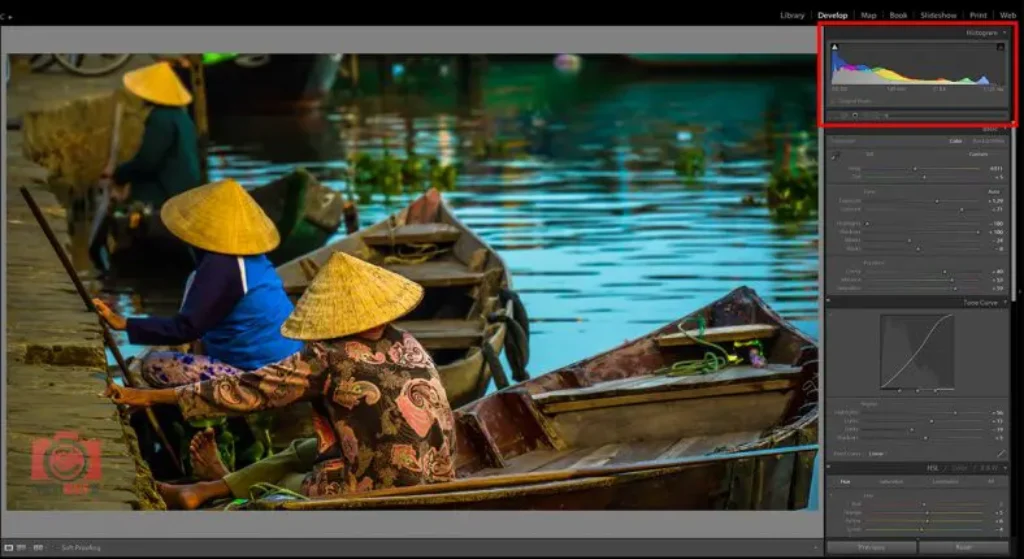
Normal histogram in Adobe Lightroom. Credit: Yoreh Schipper / Camera Deals Online
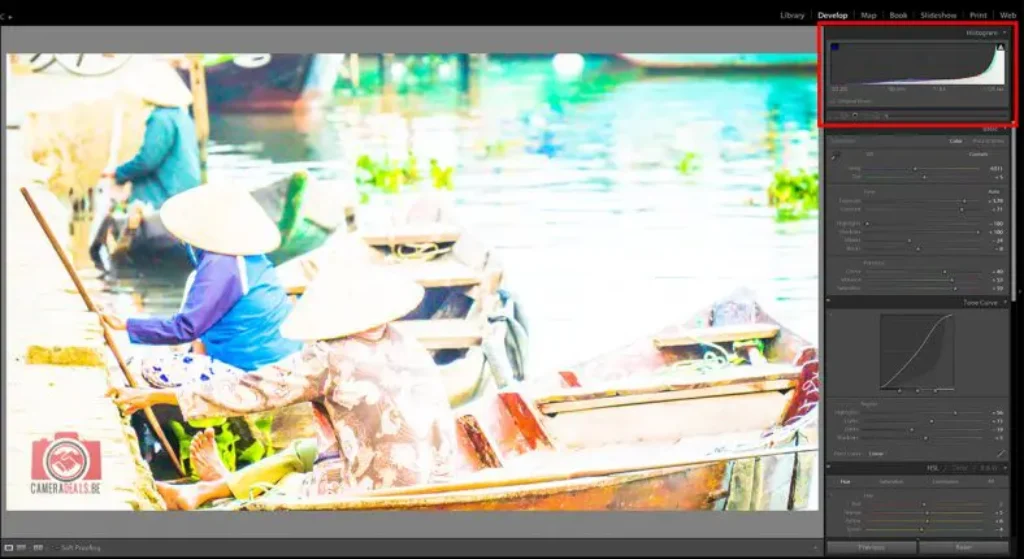
Overexposed histogram in Adobe Lightroom. Credit: Yoreh Schipper / Camera Deals Online
Underexposed histogram in Adobe Lightroom. Credit: Yoreh Schipper / Camera Deals Online
Interlaced (i) vs. Progressive (p) video
Using Interlaced video is not very common nowadays and comes from the old television era. With interlaced video, the t.v. signal was sent in two parts: the even lines and then the odd lines. The television ‘interlaces’ (merges) these images into one whole. When you pause an image like this, you can easily see how the image is constructed.
During the introduction of digital video, interlaced video was still used because the processors were not fast enough for progessive video. With the Progressive picture, each frame is sent as a whole. This means that your image is of better quality. Interlaced is indicated with an ‘i’ and progressive with a ‘p’. You may have seen Full HD 1080i or 1080p. This indicates how the image was captured.
ISO Value
The ISO (International Organization of Standardization) value determines how sensitive the camera sensor is to light entering through the lens. The lower the number, for example 50, the less sensitive the sensor is. The lowest number you usually encounter on cameras is 50 or 100. The maximum number on consumer cameras is around 12,800 and on professional (video) cameras this number can be as high as 409,600 (or even higher).
Does that mean if you set a high ISO value, you also get brighter photos? Yes and no. The images will certainly become lighter, but not necessarily brighter. This is because ISO is a digital process. The image is therefore digitally illuminated, and that causes noise (grain) in the process. How much noise you see has to do with the size and quality of the sensor and the type of image processor the camera has.
There are many professional mirrorless cameras and DSLRs that offer a high ISO value. ISO-6400, for example, can give a clear image on one camera, where it is full of noise on the other camera. Assuming both cameras are set up the same way and take the same picture.
One reason that the Sony A7 series is so popular is because it still produces a reasonably noiseless image even at the highest ISO values. This is because a superb full-frame sensor and image processor are incorporated in the camera. Read more about ISO values with the camera sensor and aperture.
JPEG/JPG
A JPEG is a compressed photo, where the bare eye can hardly notice the compression. By making a JPEG/JPG from a RAW photo, a lot of space is saved. The photo is a lot smaller in terms of data than a raw photo file. The best-known compressed file names are JPEG/JPG and EXIF. Where EXIF contains extra information about where, when and how the photo was taken. Think of data such as recording time and date, shutter speed, aperture, focal length, ISO value, the lens, and the camera model.
What is the difference between JPEG and JPG?
There is no difference, they are the same. JPEG stands for Joint Photographic Expert Group File Format. On older Windows models, the extension ‘.JPEG’ could be used. With new versions of Windows, all extensions were reduced to 3 letters and that is why ‘JPG’ was created. Macintosh computers never had this limitation, and that’s why you have JPEG images there. Nowadays, Windows also accepts the JPEG extension again. That’s why you see different abbreviations, which mean the same thing.
Lens Flare
A Lens Flare occurs when the sun or another light source shines directly into the lens. Because multiple glass elements are incorporated in a lens, they reflect the light. This is why you see stretched sun stripes, prisms, or red/blue circles in the photo.
The exact shape and color depends on the point from which the light comes. Light coming from the top-left corner gives different shapes and colors than when it shines directly in the center of the lens. The light source and color also play a role. You can imagine that a setting red sun gives a different Lens Flare than a sun high in the sky. Finally, the type of lens plays a major role. Each lens is put together in a slightly different way, which also changes or reduces the lens flare.
Small lens flares over sand dunes in Peru. Credit: Yoreh Schipper / CameraDealsOnline
How to prevent lens flares
Suppose you don’t want a Lens Flare, then it is useful to use a lens hood or UV filter. A lens hood is often included with the lens as standard, but you can also choose to buy a larger and better lens hood. These lens hoods are somewhat longer, so that even less unsolicited light enters. A UV filter can help to filter the incoming light so that you remove almost all flares immediately. The more expensive your lens, the better coatings are used to prevent unwanted lens flares and aberrations.

Round lens flares at the Havana, Cuba skyline. Credit: Yoreh Schipper / CameraDealsOnline
You can use a Lens Flare to give a special effect to the photo. For example, the flare can run exactly along the line of sight so that you draw extra attention to the subject. But it can also produce a very dreamy or woolly effect.
LOG profile
LOG is a color profile that extends the camera’s dynamic range by including more detail in the highlights and shadows. Working with this profile is really only for professionals because setting the profile properly before your film is a meticulous job. The color post-processing also takes more time because you have to return the flat profile to ‘normal’ colors using a LUT (lookup table). However, if you master this technique, you can create stunning cinematic images.
Low pass / antialiasing filter
You might have seen it in a camera product description: a camera sensor that has no or a low-pass (antialiasing) filter. A filter like this is also called an ‘anti-blur’ filter. The filter ensures that you don’t get any color distortions or ‘moiré’ in your images. Moiré are a kind of rainbow colors that affect your photo negatively. The Low-Pass filter ensures that you do not get this effect. When you shoot close-up or mid-wide images, it is important that your images do not contain moiré, but this effect hardly occurs with landscape photographers, for example. The disadvantage of the filter is that the finest details are lost and that you suddenly miss numerous details in landscape photos, for example.
Moiré
Moiré is a pattern that can appear in your photo and looks like little rainbows. It is an unwanted effect that causes colors to be distorted. You will never encounter this effect in nature, and you mainly see it in photos of textiles, hair, and all kinds of everyday products. To remove this effect, many cameras use a low-pass or antialiasing filter.

Moiré on jacket. Credit: Photo.net
Megapixels
One megapixel consists of 1 million pixels. A 20 megapixel camera therefore has 20 million pixels at its disposal. The number of pixels is especially useful if you want to zoom in on a photo because then the details become important.
The screen you are currently looking at is made up of many pixels. One pixel is about 0.26mm in size, and you need quite a bit of pixels to fill a screen. Pixels are usually square and form a grid. A 1 megapixel camera will have a resolution of about 1200 pixels by 900 pixels. The more megapixels there are in a photo, the larger the file becomes. On cameras and phones, you often have the option to take a photo in a lower resolution so that it does not take up too much memory space.
What do megapixels say about the photo quality?
The number of megapixels mainly says something about the number of megapixels, but doesn’t say much about the photo quality. The final quality of your photo depends on the following elements:
- The image processor
- Sensor size
- Lens
- ISO value
- Diaphragm
- Lighting your subject
A photo is only as good as its weakest link. Suppose you take a picture with the most expensive camera in the world, but you take a picture that is out of focus and blurred, then you still have a bad picture. More than 12 megapixels is already more than enough for normal prints. You can look at more megapixels (20+), if you want to crop, enlarge photos, print at larger sizes or edit them in detail using a photo editing program.
How many megapixels do you need?
How many megapixels you need depends on what you want to do with the photo. Nowadays, it is almost impossible to find a new camera that has less than 10 or 12 megapixels. That means that you have enough pixels anyway to print the photos at 300 dpi (dots per image) for a photo book, for example. A larger resolution than 12 is especially useful if you want to crop (crop) the photos, zoom in or print them in a giant format.
ND filter
An ND filter (not to be confused with a UV filter) is a kind of sunglass for your lens. There are two types of ND Filters. The first type of ND-Filter is a kind of sunglass that makes the incoming light less strong with a fixed strength. Fixed-strength ND filters reduce light normally by 8, 16, or 32 stops. If you want to change the strength, you have to change the filters. So, it takes a bit of work, so this is most useful in circumstances where the light doesn’t change too much.
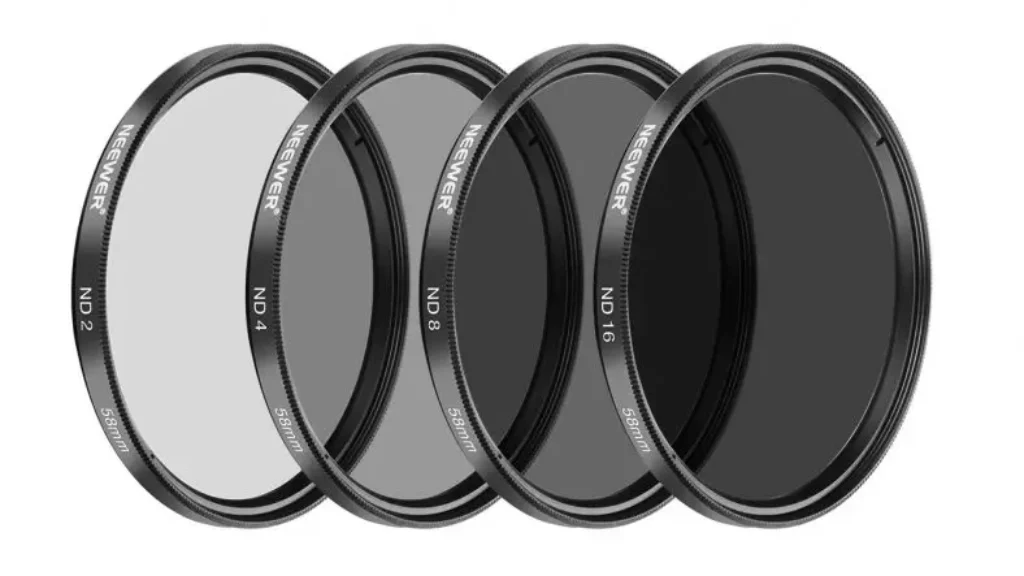
ND Filters
Are you shooting outdoors and do you have to deal with changing lighting conditions? A variable ND filter might be useful for that. With a variable ND filter, you turn the glass to change the stops from, for example, from 8 to 32. Of course, these types of filters are often a bit pricier.
Penta mirror or Pentaprism
The Penta Mirror is used on (D)SLRs and makes sure that the image can be seen through the viewfinder after the light enters through the lens and the mirror. Light enters through the lens and is reflected on the mirror. This mirror reflects the image straight up, which means you can’t see anything through the viewfinder yet. The penta mirror is a mirror that consists of 3 parts and ensures that the light is reflected to the viewfinder.
Pixel binning, line skipping vs. oversampling
You only need 12 megapixels to make 4K film, but the sensor in question often has more megapixels. There are various ways for manufactures to use the megapixels to shoot film:
1: Cropped video: This uses a smaller portion of the sensor and only the megapixels needed to capture video. Your image is therefore less wide, and this requires little processing power.
2: Pixel Binning/Line Skipping: Combines and skips pixels to get the required number of megapixels for the video. However, this does not give the best image quality, and it is a cheap approach
3: Oversampling: The video is recorded with all the pixels on the sensor and then reduced to the required image size. This gives the very best quality because a lot of extra image information is present. However, it is a more difficult process for the camera.
RAW
RAW photos are unprocessed files and must be edited, (color)corrected, and then saved to a readable format such as TiFF, PNG, or JPEG. A RAW photo file can best be compared to the negatives of a film roll. RAW (raw) stores as much information as the camera allows. How much information is stored depends on your model and the quality of the camera.
The file sizes of a RAW photo are 2 to 6 times larger than a JPEG, this is because it contains so much information. While editing, you have the biggest dynamic range possible and more room to play with shadows, colors, lights, contrasts, and white balance. In addition, a RAW photo is sharper and as little compression and processing as possible has been added. So, there is no added noise reduction or sharpening.
RAW video
RAW video images are uncompressed images with no color profiles applied. The resulting files are huge and heavy and can only be recorded by the more professional models. You often need an external recording device to capture RAW, but some models allow you to record RAW internally. Filming in RAW is only recommended if you work with a script because the footage takes up a lot of space and (computer) processing power.
Noise reduction or suppression
Noise reduction or noise suppression is a process that takes place in the camera after the picture has been taken. The image processor converts the incoming light that has hit the sensor into a digital photo. Colors, lighting, and contrasts are processed, noise is suppressed, the image is sharpened and converted into an image that we can view on the screen.
The way noise is suppressed depends on the quality of your camera and image processor. It’s fairly easy to completely suppress noise, but you lose a lot of detail and sharpness in the photo as a result. When noise reduction is added in-camera, you can’t undo the action, unless you have a RAW-photo saved as well.
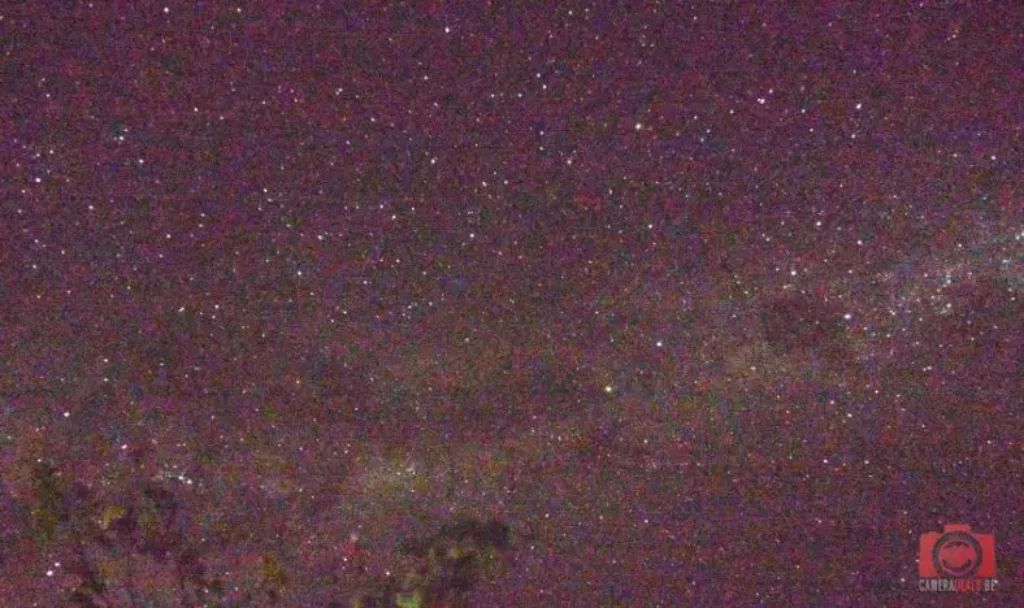
Starry sky with heavy noise. Credit: Yoreh Schipper.
What is Noise?
Noise can be recognized by small spots and specks in the photo. The color of noise goes from blue, green, red, gray, white, and black. Often it is a combination. In dark areas, such as shadows and dark tones, you see noise first.
The noise is created by, for example, making the sensor digitally more sensitive to light. This is done by boosting the ISO value. But also by dropping it on the sensor for a long time, for example when taking a photo with a long shutter speed. Suppose a photo came out too dark, you can lighten the photo in post-processing. If you brighten the photo too much, noise can also appear in the dark areas.
Noise found in overexposed photo. Credit: Yoreh Schipper
How do you prevent noise?
To prevent noise, you must set the exposure triangle correctly. This includes the aperture, shutter speed and ISO value.
Don’t use high ISO values
One of the most important ways to avoid noise is to not set the ISO too high. With consumer cameras, such as compact cameras and cheaper mirrorless and DSLR cameras, you want to avoid setting the ISO higher than 6400. If you do, you have a greater chance of noise.
Left: no noise reduction | Right: with noise reduction (Huacachina, Peru, by Yoreh Schipper)
Large sensor
There are several cameras, such as the Sony A7 series, that can handle extremely high ISO values without showing too much noise. This is because these cameras have a full-frame sensor (Sony) and a superb image processor. A large sensor lets in more light, and therefore you immediately have less chance of noise.
Light sensitive lens
Make sure you have a light-sensitive lens. The more light the lens lets in, say f/2.0, the less you need to crank up the light in the camera in dimly lit conditions. It is always useful to properly expose the subject you capture. If possible, of course.
Slower shutter speed
To let in more light, you can see if your shutter speed can be lowered a bit. You might set the shutter speed to 1/50, but maybe 1/30 is also sufficient. It is important to look at the environment. A quiet landscape allows longer shutter speeds than a busy, moving city. The lower you set your shutter speed, the more important it becomes that you use a tripod. Otherwise, you will see long movements and lines in the photo, which could also be a creative choice, of course.
Depth of Field
When you talk about depth of field, you are talking about photos with a sharp foreground and a blurred background, or vice versa, or a photo with almost no difference in sharpness at all.
Lots of depth of field: almost everything in the photo is sharp, from the foreground to background. Used with landscapes or wide photos in architecture.
Shallow depth of field: A small part of the photo is sharp, and the surrounding parts are not. Think of portrait photos or macro photos of flowers or insects.
How do you create depth of field?
You create this effect by setting a large aperture on your lens. The larger the aperture, the smaller the number. Aperture is also referred to as f-stop, with the letter f. For example, f/1.4 is a large aperture and this ensures that there is a big difference in sharpness between the foreground and background. If you want the photo to be flatter, with both the foreground and background being equally sharp, then you use a small aperture such as f/8 or f/12.
Depth of field is used to make the eyes focus on a particular point, but also to give a dreamy effect with bokeh in the background. This is difficult with a large landscape because all the elements are in far away. But the moment you capture that same landscape through the branches of a bush, you can focus on both the landscape and the bush. Suppose you focus on the landscape (which you see through the bush), then the branches become very blurry.
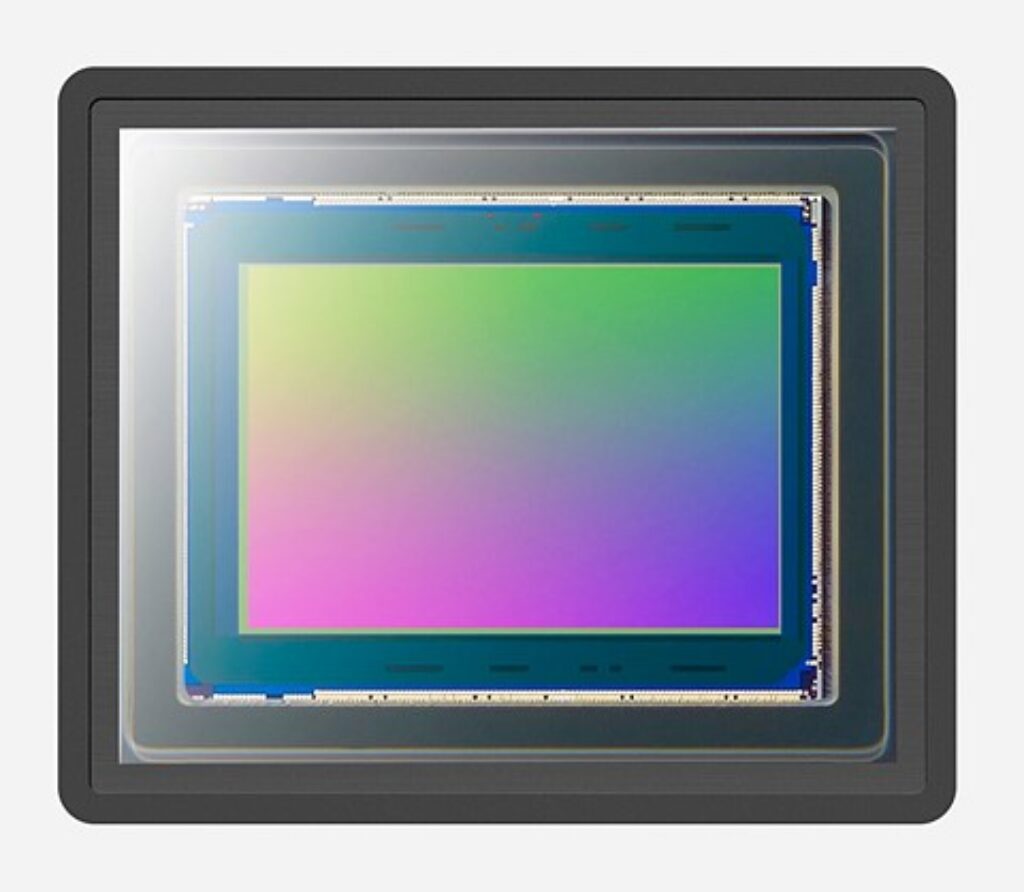
Sensor
The camera sensor captures the light that enters through the lens. The size of the sensor largely determines how expensive your camera is, and the size is an important factor when choosing your new camera. There are different sizes of sensors and the larger the sensors, the more light they can capture and a larger angle of view you get. A larger and light-sensitive sensor is also pricier. Because the sensor captures more light, you have more options when it comes to shutter speeds (important for sports) and shooting when it gets dark. You may notice that cameras with a small sensor are referred to as “the 35mm equivalent”, meaning the full-frame sensors and used as a starting point for comparison.
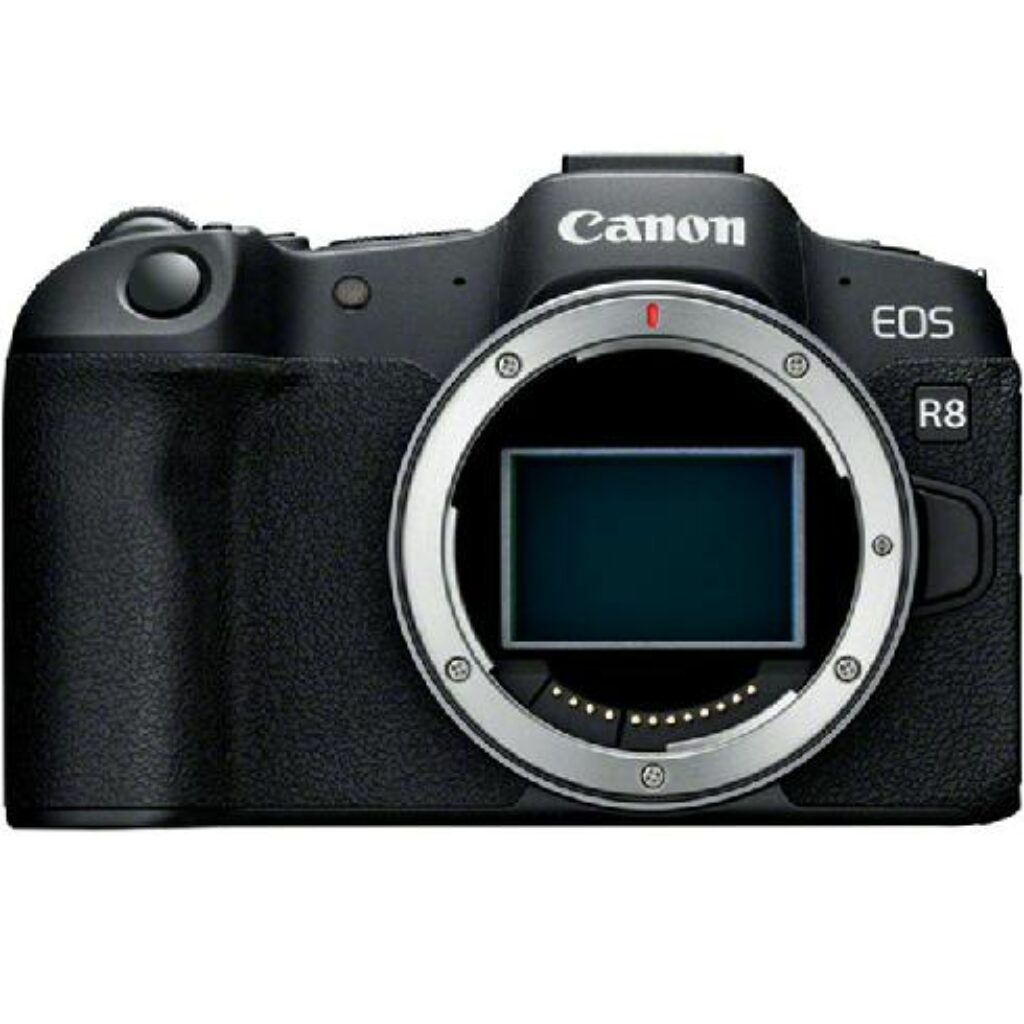
Canon EOS R8 with a full frame sensor
Sensor crop factor
With a crop, a smaller part of the sensor is used, with parts of the sensor being cut off. The size of the sensor is important in both photography and videography. A full-frame sensor (35mm) is the largest, captures the most light, gives a wider image and a wider depth of field. For this reason, this sensor is also the most expensive. Smaller sensors such as APS-C and Micro FourThirds (MFT) have a crop compared to the 35mm sensor. With an APS-C sensor, you have a crop (zoom-in) of 1.5x or 1.6x, and with MFT, a 2 times crop (compared to 35mm full frame).
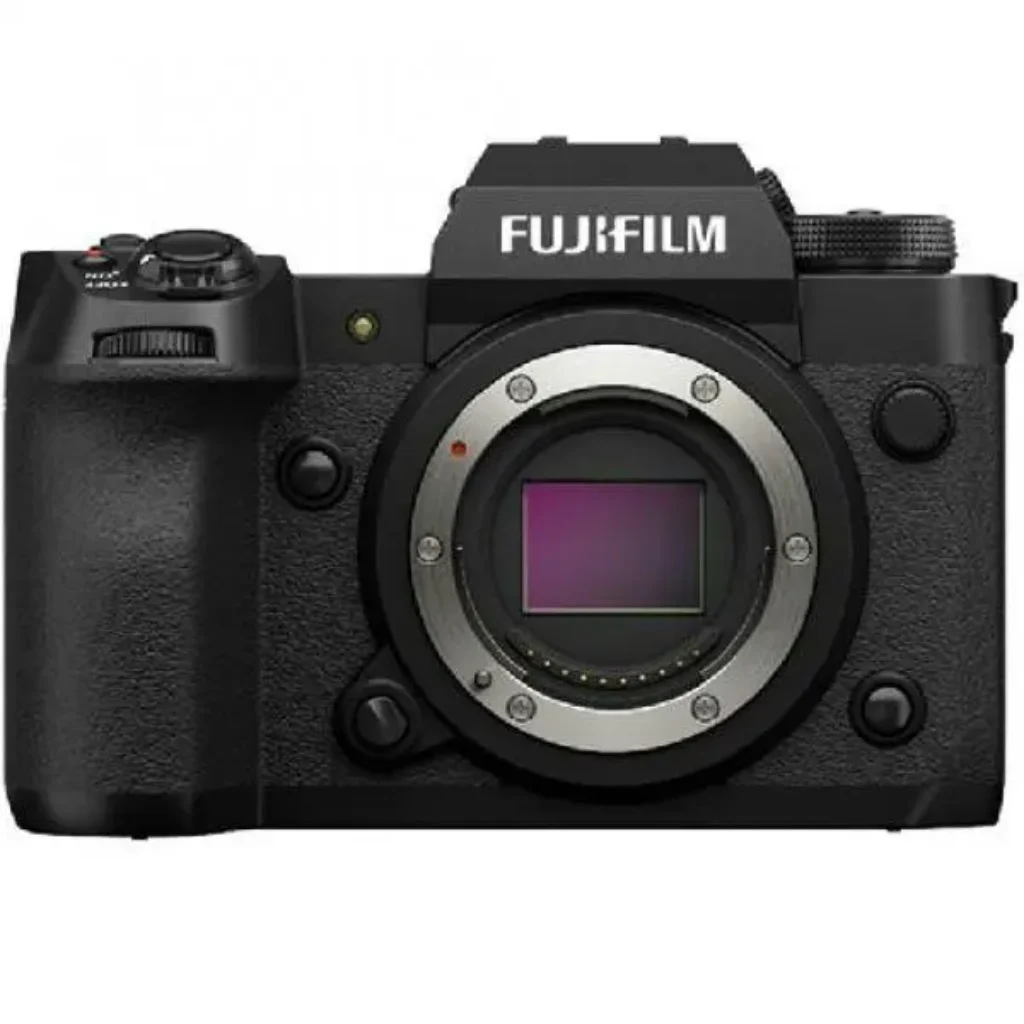
Fujifilm X-H2 with APS-C 1.5x crop sensor
Crop in video is important to take in account because when you film in 4K, not the entire sensor is always used. Suppose you film in 4K with a crop, then your image will be zoomed in a bit more, and you will have a smaller angle. This means that when you use a 35mm lens on an APS-C sensor with 1.5x crop, the actual focal point is 52.5mm (1.5x).
Shutter Speed or Exposure Time
Shutter speed is the time the shutter is open to allow light to hit the sensor. Shutter speed is always indicated in a fraction of the second, for example 1/8000 or 1/500. That means a 8000th or 500th of a second. When capturing (fast) moving objects, it is important to set a fast shutter speed. While setting a slower shutter speed (1/25 or 30 seconds) is important for evening images, stars, or photos in which you want to see movement, such as water or light stripes.
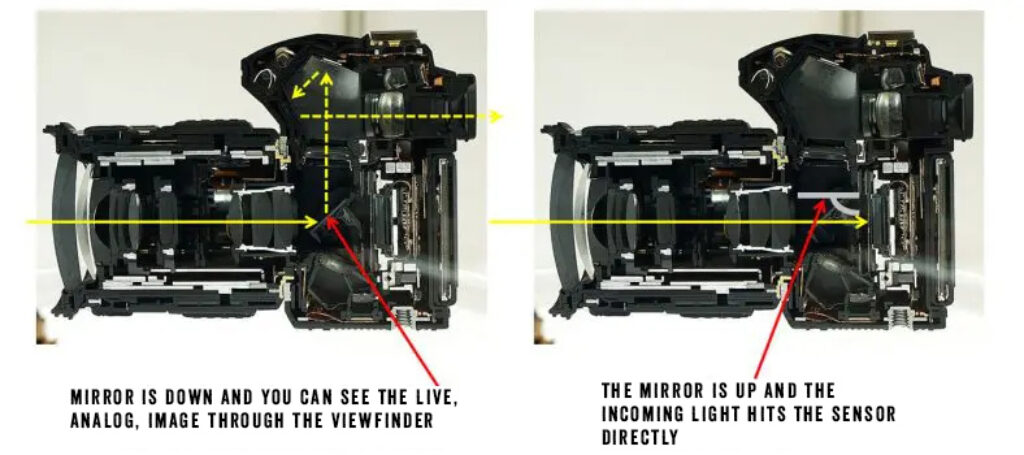
SLR or DSLR camera
What is an SLR camera? That’s a good question because many people search for a term like this. An SLR camera is a camera with interchangeable lens. The light enters through the lens and through a mirror and penta prism this light is reflected to the viewfinder. Through the viewfinder, you see exactly what the lens also sees. This means that you have the most realistic possible representation of reality.
The moment you take a picture, the mirror moves up briefly so that the light can hit the sensor. The sensor, together with the image processor, converts that light into a digital photo that you see on the screen.

Advantage of SLR cameras
The advantage of SLR cameras is that they are often somewhat larger and heavier. This gives you a better grip and less vibration in your image. Every setting on this camera can be changed and saved manually. They are cameras for photographers who want to get serious about photography. Of course, there is also an auto mode on the camera, but these types of cameras are not intended for that.
Types of SLR cameras
SLR cameras come in all kinds and sizes. There are cameras for the beginner, advanced to professional and professional photographers. But what is the difference then? The difference in these cameras will mainly be found in the type of image processor, sensor (size), photo quality and data rate and general build quality.
DSLR name explanation
DSLR stands for Digital Single Lens Reflex. Before these cameras became digital, they were called SLR.
SLR camera vs. mirrorless camera
The most significant difference between a DSLR and a mirrorless camera is the fact that the latter has no mirror. This makes the mirrorless camera more compact and therefore lighter. With a mirrorless camera, it is also possible to change lenses, take good photos and, above all, record high-quality films. An advantage, mirrorless cameras have, is that the lenses can be placed closer to the sensor. This closer placement makes sure less light and information gets lost.
Stacked Sensor
Stacked sensors go a step further than Back Side Illuminated (BSI) sensors. The sensor layers and circuits are fabricated, then highly polished so that they can then be joined (Stacked). This makes the sensor more complex and gives the option of building RAM directly into the sensor, instead of processing it in the image processors. As a result, you have an extremely fast readout speed.
Sony A1 stacked sensor
Mirrorless camera
A mirrorless camera is a digital camera where you can change the lenses and have full control over all settings. Today, these cameras are popular among photographers and videographers as well. Newer models have full-frame sensors and a high megapixel count, making these cameras very interesting for the travelling photographer. But also in the video field, these are real powerhouses. For example, there are cameras for sale that can shoot up to 8K film. In addition to this high resolution, these cameras are also capable of processing photo and video images at high (raw) data rates. This gives you even more details in your photo or video.
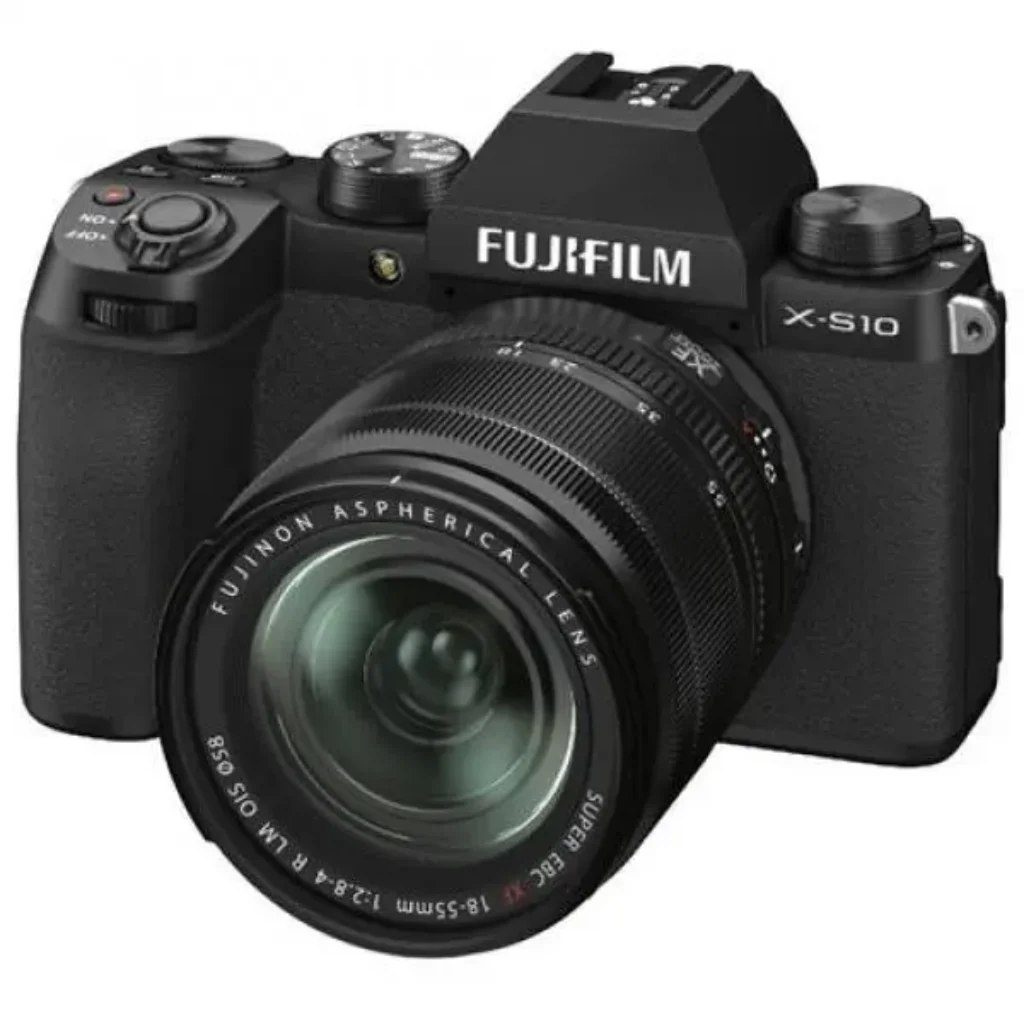
Fujifilm X-S10 mirrorless camera (with APS-C sensor)
Difference with DSLR cameras
Whereas with an DSLR camera, the light enters through the lens and is then reflected to the viewfinder via the mirror, with a mirrorless camera, the light ends up directly on the sensor. The image you see through the viewfinder is digital. The advantage of this is that you immediately see adjustments to aperture or shutter speed. But you can also see filters such as black and white immediately. So, you have an exact representation of what your photo will look like. With DSLR cameras, this was only possible by switching on the ‘live view mode’ on the LCD screen. The downside of an electronic viewfinder is that it might be slower. This is especially a problem with fast-moving objects. You would need a special sports mirrorless camera with fast refresh rate to be able to see fast-moving objects without lag.
If a mirrorless camera can do the same as a single-lens reflex (DSLR) camera, why would you ever buy a DSLR again?
A mirrorless camera is light and compact, but that also means that you have less grip. Due to the light weight, you will sooner see movements in the photo that are made by the vibrations of your hand. In addition, SLR cameras always have an accessory shoe (hotshoe) connection, microphone connection, a viewfinder, RAW photo function and some extras that not every mirrorless camera has. Do you want a mirrorless camera to come close to a DSLR in terms of photography? You often already have to buy a high-end model. And nowadays, it is true that mirrorless can do more than the old DSLR cameras can.
White balance
White balance in the camera ensures that the color white is really white, and it controls the ‘warmth’ or ‘coolness’ of the colors in the photo. By changing the white balance of the photo, you can make it seem very warm or very cold.
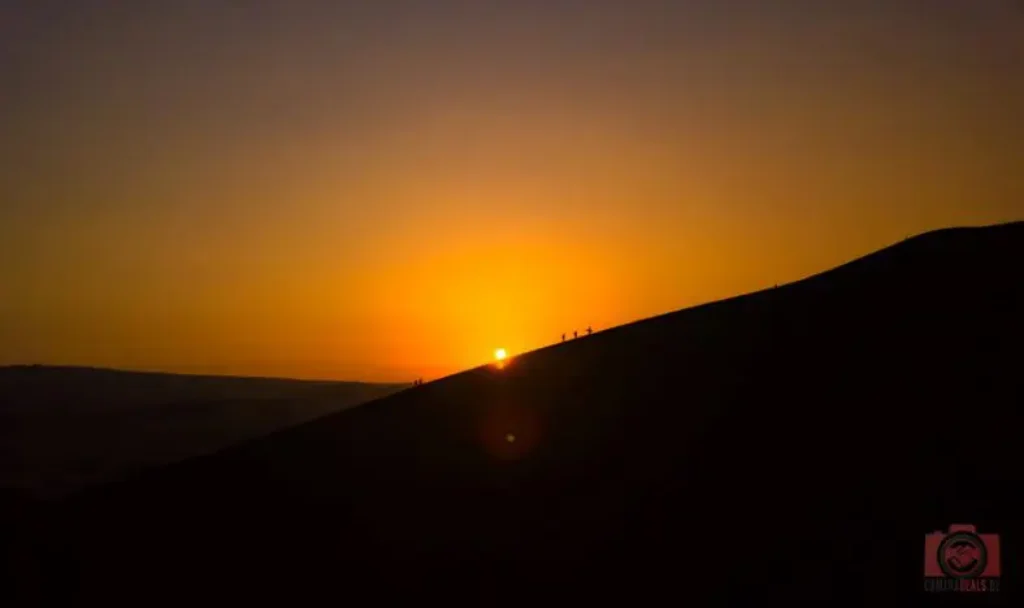
Every light is different; If you look at the sun, it is not always the same warm color. Occasionally, it is yellow and towards evening it can become redder and warmer. Where a fluorescent tube emits white light, an energy-saving lamp gives yellow and warmer light. The light you see when it’s cloudy feels colder and more blue, and during a sunset, you get warm yellow / red colors. The half hour before and half an hour after sunset is also known as ‘Golden Hour’. This is because you find the best lights and contrasts around that time.
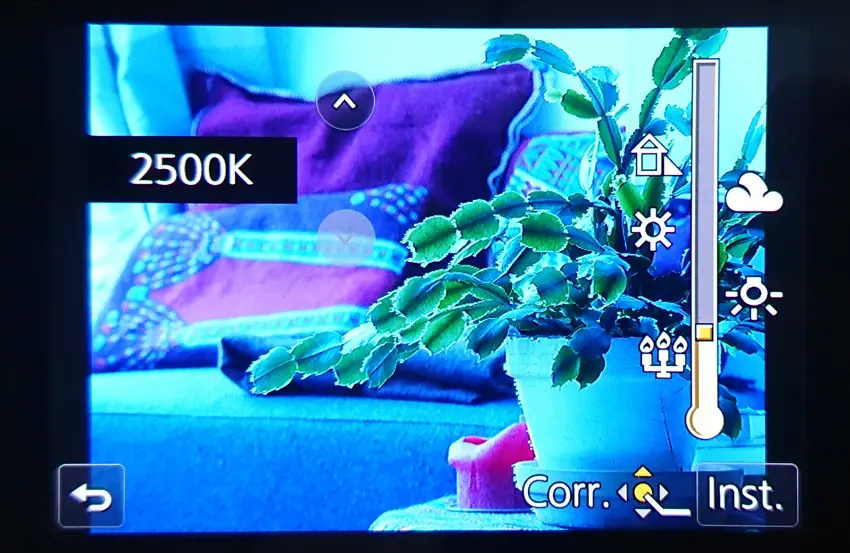
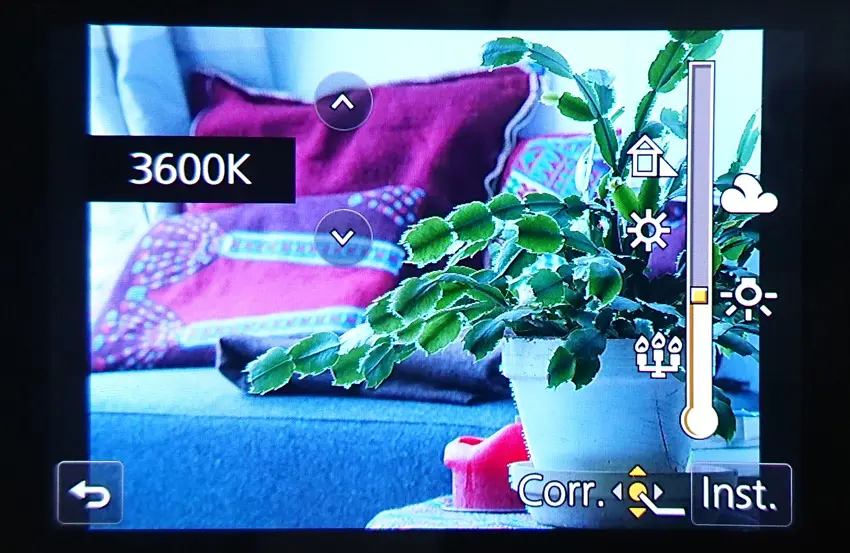
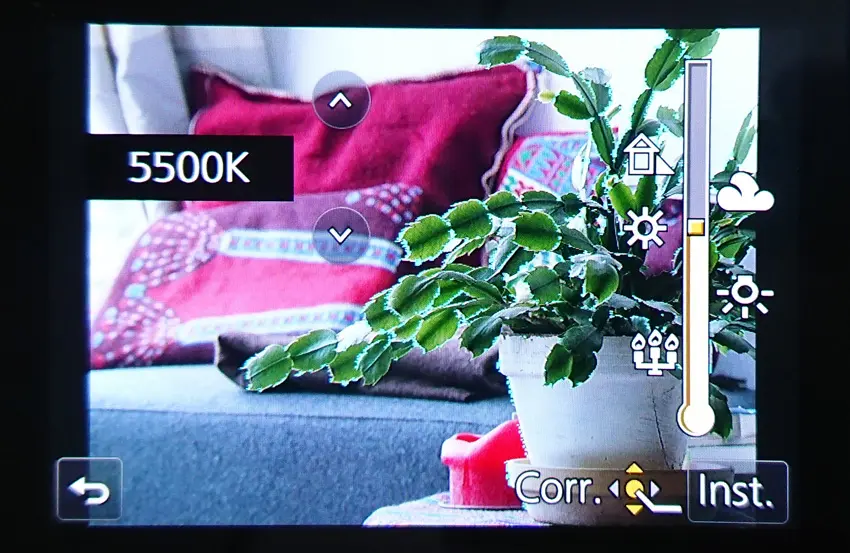
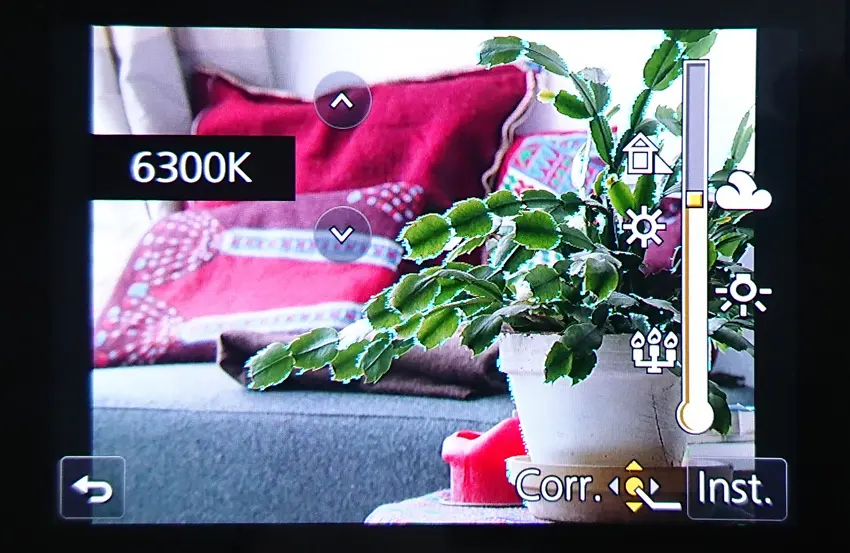
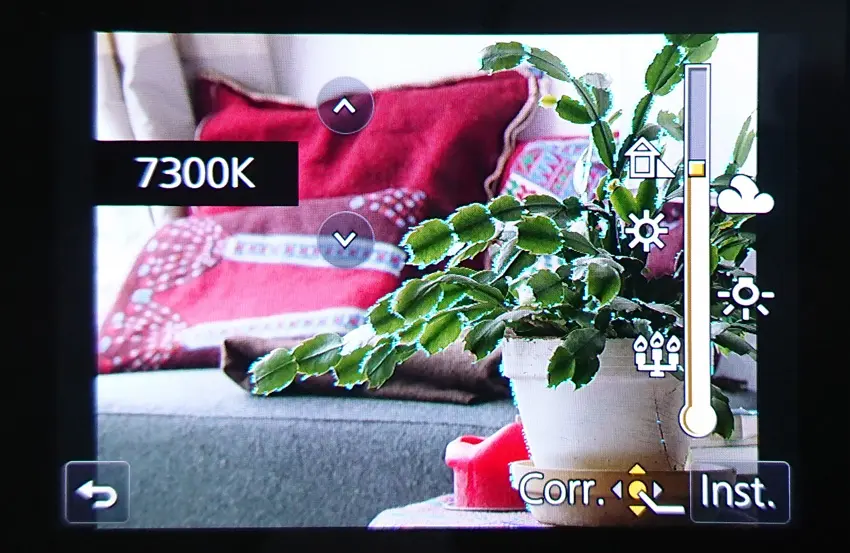
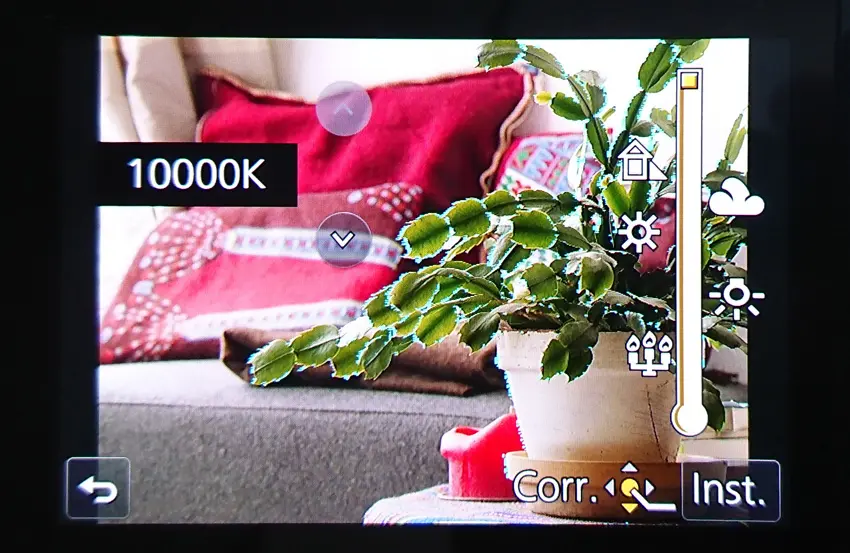
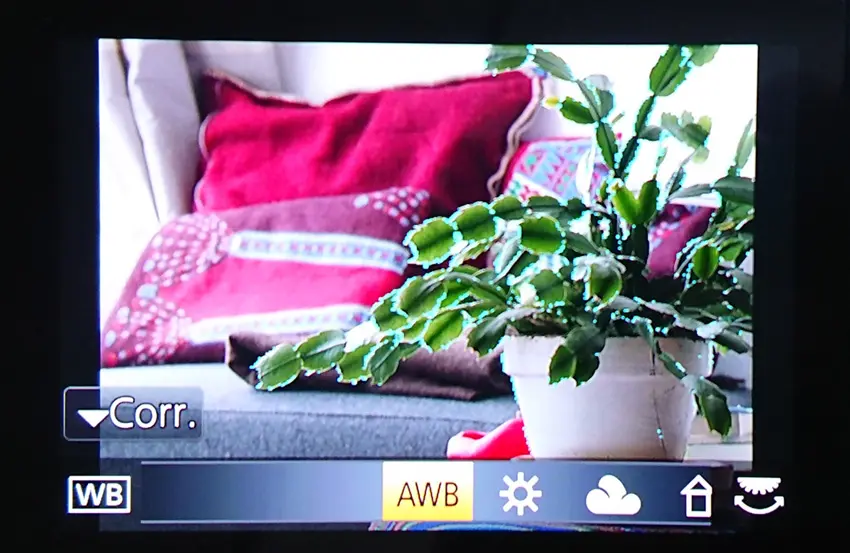

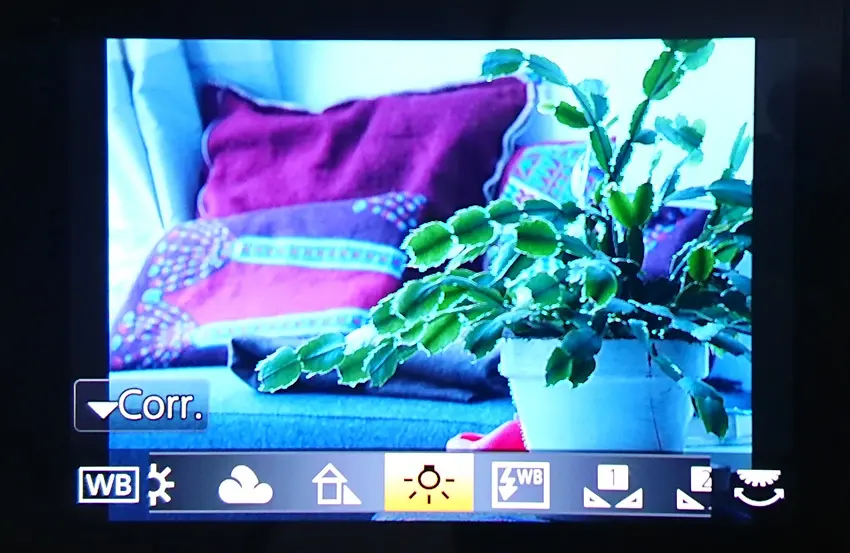
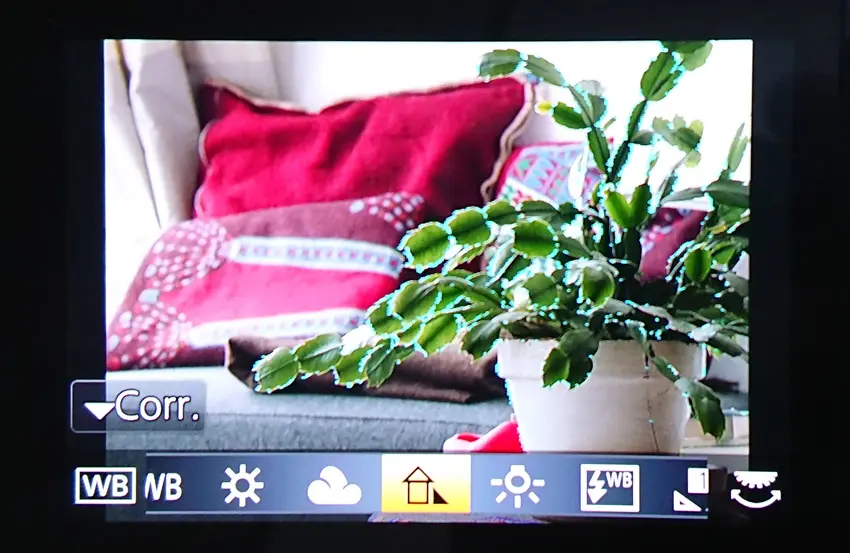
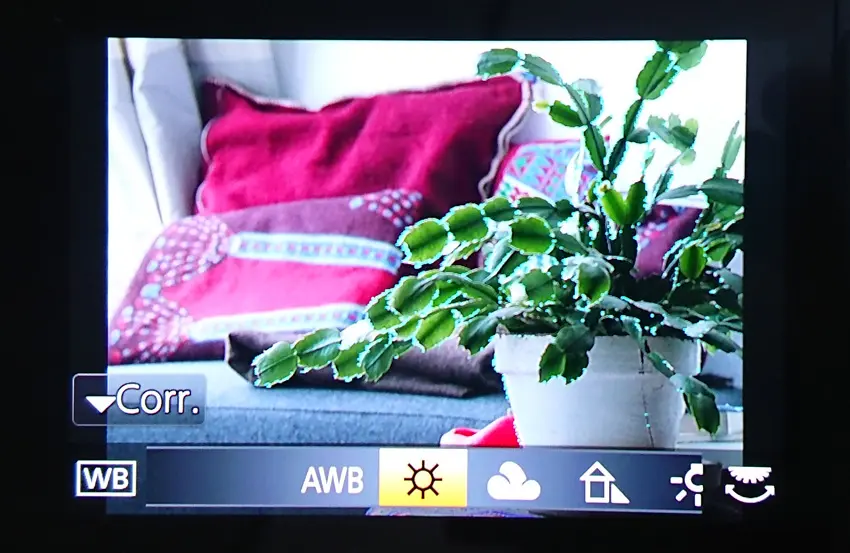
The color is indicated with the letter ‘K’ (Kelvin) and a number. The white balance colors go from a yellow warm color to a blue cold color.
- Candlelight: 1900K
- Heated light: 2700K
- Sunrise/Golden Hour: 2800K to 3000K
- Halogen lamps: 3000K
- Moonlight: 4100K
- White LEDs: 4500k
- Daylight: 5000 to 5500k
- Flash: 5500k
- Overexposed/Cloudy: 6500k to 7500k
- Shadow: 8000k
- Heavy Cloud: 9000K to 10000K
How do I properly set my white balance?
Of course, you want the camera to capture the most natural colors and for that, the white balance must be set correctly. You can set this manually in the camera, but there are also presets and an automatic mode. The auto mode is useful, but can be dangerous if the camera does not have a ‘pure white’ reference. You can use a ‘gray card’ to set the white balance properly. There are different shades of white on this gray card. A white A4 sheet also works fine.
Do I use automatic, preset, or manual white balance settings?
If you have the time, it’s always best to set the white balance manually. A good white balance can give that little extra to a photo. Auto mode is quite reliable on many cameras, but can get confused if it doesn’t have enough reference whites. Using auto mode in changing light can result in images of the same subject with different white balances. This might not work well when you shoot a model, since the color on every image will be different.
Preset
A preset is fine if you know you’ll be shooting in the same environment for a while. Think of shooting outside in a sunny village, inside a castle or at a party. But if you know that the lighting conditions remain almost the same, then it is not much trouble to set the white balance yourself.
Manually
If you shoot professional projects, you always make sure that everything is set manually. With auto settings, you lose control, and you have the chance that something different is recorded than you want.
Viewfinder
The viewfinder is the part on top or on the side of a photo or video camera that you look through with one eye. The viewfinder comes originally from the SLR camera. Thanks to the viewfinder, it became possible to see what the lens sees and to take a well-framed photo, without being bothered by ambient light. Whereas with SLR cameras you receive an analogue image via the lens, mirror and penta mirror, the viewfinder on compact and mirrorless cameras are digital.
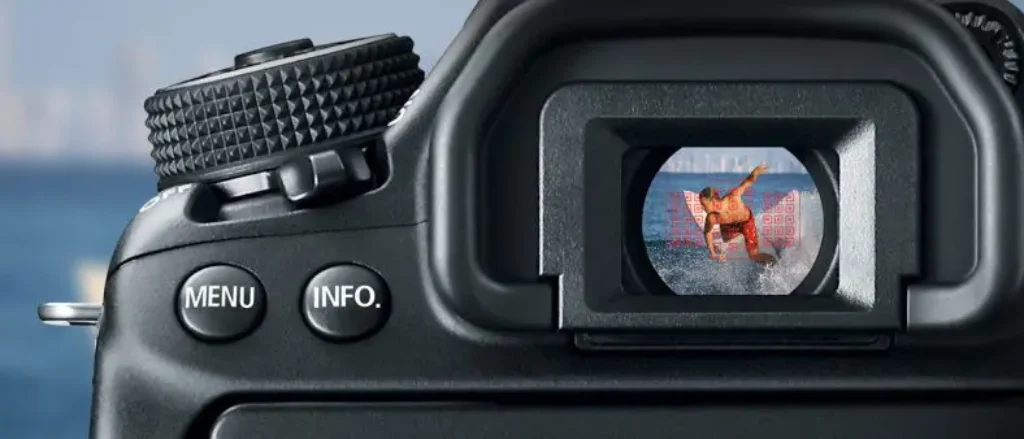
Viewfinder on camera
Do you have questions about camera terms and words? Then put them in the comments below!
– All information on this website and page is subject to copyright and is the property of CameraDealsOnline.com. This information may not be reproduced or copied without the permission of CameraDealsOnline.com. –
What is Camera Deals Online?
![]()
We at Camera Deals Online find the best video and photo camera, lens and drone and online prices for you. With us, you can find camera prices, top-lists and we write reviews and blogs with tips and camera information. In addition, we give you the latest news about camera smartphones, camera equipment, film, and photography field. This way, we help you find and buy the best camera, lens, drone, gimbal and accessories. Our website is 100% independent.
CameraDealsOnline exists thanks to you! When you buy a product through one of our links, we receive a small percentage of the total amount. This has no effect on the price of the product. Thank you!
News and recent posts


